
In the age of digital abundance, external hard drives have become indispensable companions for Mac users seeking additional storage space and conveniently transferring large amounts of data. However, picture a situation where your external hard drive is not showing up or being recognized on your Mac.
This perplexing scenario can be a cause for concern, especially when your valuable data seems momentarily inaccessible. Whether you’re trying to access critical work files, cherished memories in the form of photos and videos, or any other crucial data, the inability to connect with your external drive can disrupt your workflow and digital experiences. In this comprehensive guide, we’ll explore several troubleshooting steps to fix external hard drive not showing up or recognized on Mac and get your external drive back in action.
Possible Causes for External Hard Drive Not Showing up or Recognized on Mac
The external hard drive can occasionally fail to show up or be recognized by Mac. This issue, though not uncommon, can hinder access to vital data stored on it. Before identifying practical solutions, it is crucial to explore potential causes as a prerequisite for implementing effective measures and restoring seamless functionality.
Generally, external hard drive not showing up or recognized on Mac could stem from several factors, including loose or damaged cables, faulty USB ports, incompatible/corrupted file systems, software conflicts, outdated external drive drivers, and so on.
How to Fix External Hard Drive Not Showing up or Recognized on Mac?
Fix 1: Do Some Basic Checks
If you find your external hard drive isn’t showing up anywhere on your Mac, a seemingly obvious yet frequently overlooked step is to begin troubleshooting with some basic checks, which can often identify common issues and pave the way for effective solutions.
– Check physical connections: Ensure that the cables connecting your external hard drive with your Mac are securely plugged in. Try using a different USB or Thunderbolt port on your Mac to rule out port-related issues.
– Inspect for cable damage: Examine the cables for any signs of damage. If you find frayed or bent cables, consider using a new or spare cable to connect your external hard drive.
– Use a different computer: Connect the external hard drive to another Mac if available. This helps determine whether the issue is specific to your Mac or if the external drive itself is causing the problem.
– Check for external drive power: If your external hard drive requires a separate power source, make sure it is powered on. Some drives might not function correctly without adequate power.
Fix 2: Adjust Finder Preferences
At times, your Mac might not display an external hard drive in the desktop or Finder due to system settings, but you can rectify this by adjusting Finder Preferences.
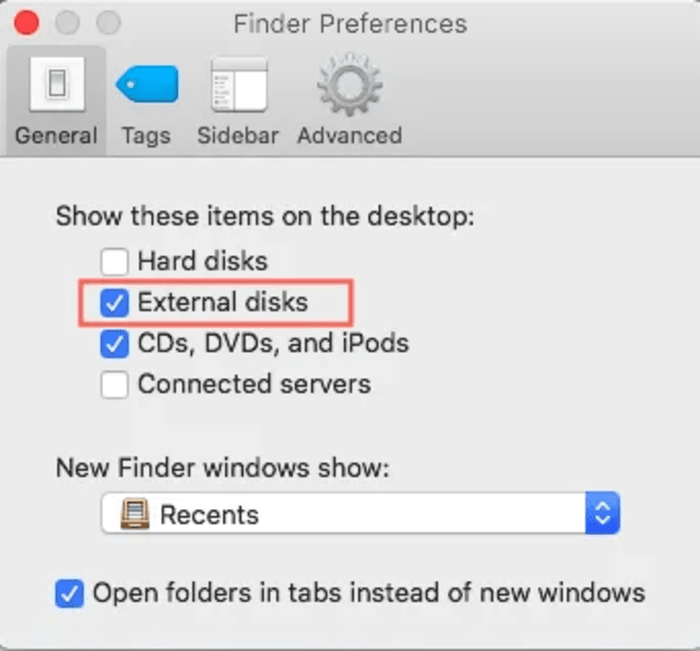
Step 1: Navigate to Finder > Preferences > General, then tick the checkbox before “External disks” to ensure external hard drives attached to the Mac can appear on the desktop.
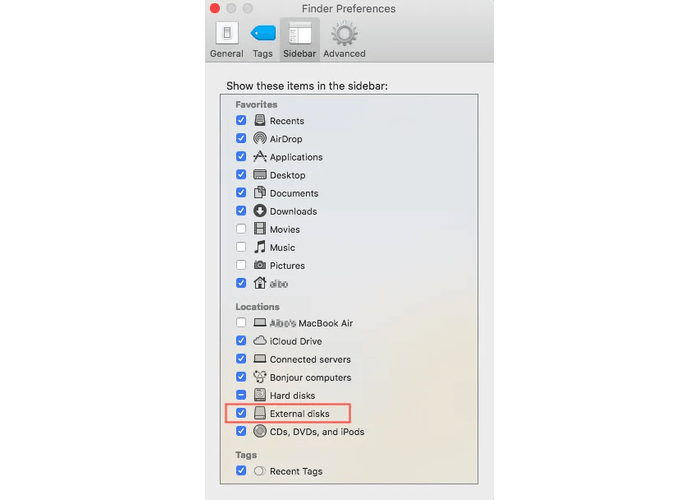
Step 2: Move to the Sidebar tab in the Finder Preferences window, and confirm that you have already checked the “External disks” option under “Locations“. This action will make your external hard drive visible in the Finder sidebar.
Step 3: Check if your external hard drive is now visible on the Desktop or in Finder.
Fix 3: Boot Your Mac in Safe Mode
Certain incompatible applications like USB security apps, encryption software, or recently installed antivirus programs may be preventing your Mac from recognizing the attached external hard drive. Given that, consider booting into Mac Safe Mode, which only activates essential macOS components and disables unnecessary software, potentially resolving conflicts that affect external drive recognition.
Step 1: Restart your Mac while pressing and holding the Shift key immediately until the progress indicator appears.
Step 2: Reconnect your external hard disk to the Mac and check for detection. If the external hard drive is acknowledged by macOS in Safe Mode, proceed to restart your Mac in normal mode. Then, uninstall any suspicious programs that you installed recently.
Fix 4: Verify if the External Hard Drive Is Visible in Disk Utility
If you’ve attempted the previously mentioned methods to troubleshoot and resolve connection issues without success in locating your external hard drive on the Mac Finder window, proceed to Disk Utility.
Disk Utility is a powerful tool for identifying and managing all internal and external hard drives detected by macOS, even those with minor issues. Simply go to “Finder > Applications > Utilities > Disk Utility” to look for your external hard drive from the left sidebar.
Typically, there are two common situations encountered in Disk Utility. One case is the external hard drive is visible in Disk Utility but appears greyed out (labeled as Not Mounted), indicating macOS has detected it but it’s not fully mounted. Hence, you can’t see or access it as usual, requiring remediation in Disk Utility.
First, you can try to manually mount the external hard drive in Disk Utility.
Step 1: In the Disk Utility window, expand the “View” tab located in the upper-left corner and opt for “Show All Devices”.
Step 2: Locate and click on the unrecognized external hard drive and choose “Mount” from the top menu bar.
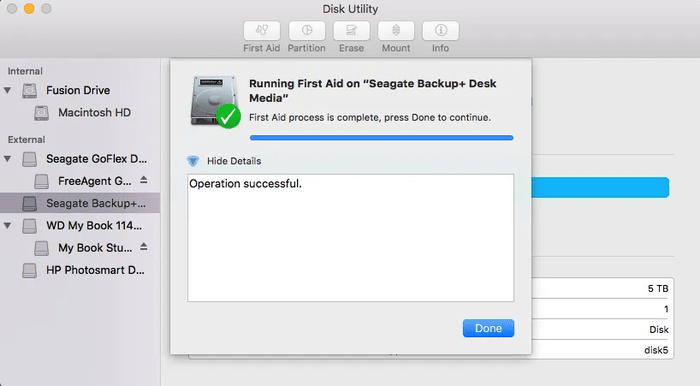
In case you can’t succeed in mounting the external hard drive manually with the Mount feature in Disk utility, you should realize that this drive may be corrupted or have directory structure problems. In this instance, choose the grayed-out external disk from the left sidebar in the Disk Utility window, and click on the “First Aid” button followed by “Run” to check and repair the disk.
Regrettably, First Aid doesn’t take effect, which suggests a more severe issue where the file system or some essential data is too corrupted for First Aid to repair. At this time, the last resort is to reformat the corrupted external hard drive. This step involves writing a fresh file system to the drive to resolve issues when the external hard drive is not showing up on Mac, albeit with the inevitable consequence of data loss.
If you lack a backup and are concerned about potential data loss, recover files from the inaccessible external hard drive using iBoysoft Data Recovery for Mac (a comprehensive data recovery application designed to recover lost videos, audio files, photos, Office documents, emails, etc. from inaccessible, unmountable, unrecognized, corrupted, and formatted hard drives, external hard drives, USB drives, SD cards, memory sticks, and more) and then proceed with drive formatting.
Step 1: Download and install iBoysoft Data Recovery for Mac on Mac running Mac OS X 10.11, macOS 10.12, or later.
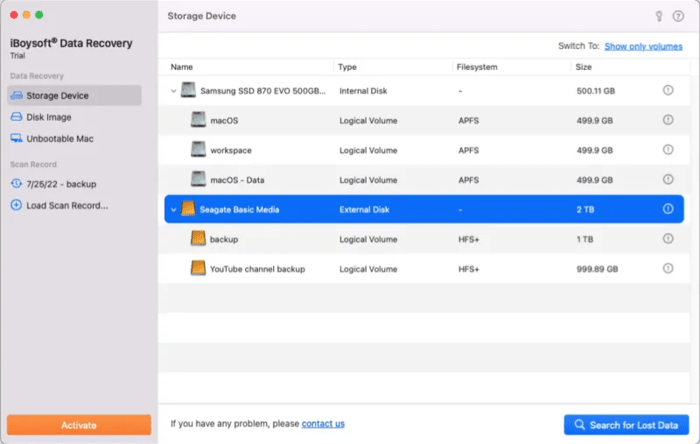
Step 2: Launch the program to check if the unrecognizable external hard drive is listed on the software interface.
Step 3: If visible, select the drive and click “Search for Lost Data” to perform a scanning to locate lost files.
Step 4: Preview the found files after scanning, choose the necessary ones, and click “Recover”.

Step 5: After successful file recovery, open Disk Utility to select the unrecognized external disk, and click “Erase” from the top menu bar.
Step 6: Complete the required information (name, format, scheme) and click “Erase” to reformat the problematic external hard drive in Disk Utility.
In the second case where the external hard drive is not showing up in Disk Utility, attempt to force quit fsck in Activity Monitor, reset NVRAM & SMC, run Mac diagnostics to detect hardware issues, update macOS, or seek professional repair services for the external drive.
Final Verdict
External hard drives not showing up or recognized on Mac doesn’t necessarily lead to permanent data loss. Armed with the right troubleshooting steps, you can often resolve the issue and regain access to your stored files. Remember to back up important data regularly to prevent data loss in case of unforeseen issues. Additionally, if needed, use iBoysoft Data Recovery for Mac to retrieve your precious data from the inaccessible external hard drive.