[lwptoc numeration=”none”]
Introduction
Are you struggling with deleting albums on your iPhone and need a comprehensive, easy-to-follow guide? Worry no more! This article will guide you through the process of deleting albums on your iPhone with various methods, including using the Photos app, Shared Albums, third-party apps, iTunes, and Finder. We will also provide troubleshooting tips and solutions to common issues. So, let’s dive in!
Deleting Albums Directly from the Photos App
You can easily delete albums directly from the Photos app on your iPhone. Here’s how:
- Open the Photos app on your iPhone.
- Tap the “Albums” tab located at the bottom of the screen.
- Scroll down to find the album you want to delete.
- Tap “See All” next to “My Albums” to view all your albums.
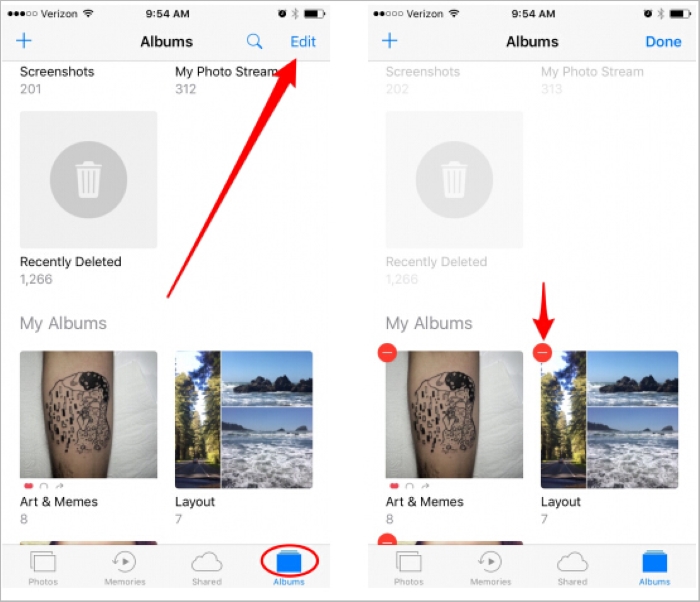
- Tap “Edit” in the top right corner of the screen.
- Tap the red minus icon (-) next to the album you want to delete.
- Tap “Delete Album” to confirm.
Note: You cannot delete default albums like Camera Roll, Favorites, or Recently Deleted. Only custom albums created by you can be deleted using this method.
Deleting Albums Using the Shared Album Feature
Another method to delete albums on your iPhone is by using the Shared Album feature. Here’s how to do it:
- Open the Photos app on your iPhone.
- Tap the “Albums” tab located at the bottom of the screen.
- Scroll down and tap on “Shared Albums.”
- Tap the “+” icon in the top left corner to create a new Shared Album.
- Name the album and tap “Next.”
- Add the photos you want to delete from your iPhone to the new Shared Album.
- Tap “Create” to finish setting up the Shared Album.
- Now, open the Shared Album you just created.
- Tap “People” at the bottom of the screen.
- Tap the red “Delete Shared Album” button and confirm the action.

This method will remove the Shared Album and its contents from your iPhone. However, it does not delete the original photos from your Camera Roll.
Deleting Albums via Third-Party Apps
You can use third-party apps to manage and delete photo albums on your iPhone. Some popular options include Google Photos, Dropbox, and Amazon Photos. Here’s a general outline of how to delete albums using third-party apps:
- Download and install the third-party app of your choice from the App Store.
- Sign in or create an account if necessary.
- Sync your iPhone’s photo library with the app.
- Navigate to the albums section of the app.
- Locate the album you want to delete.
- Follow the app-specific instructions to delete the album.
Remember that deleting an album in a third-party app may not remove it from your iPhone’s Photos app. You may need to delete the album in both places to ensure it is completely removed.
Deleting Albums through iTunes or Finder (for macOS Catalina and later)
If you have synced your iPhone with iTunes (or Finder on macOS Catalina and later), you can delete albums through your computer. Here’s how:
For iTunes (Windows and macOS Mojave and earlier):
- Connect your iPhone to your computer using a USB cable.
- Open iTunes and click on the iPhone icon in the top left corner.
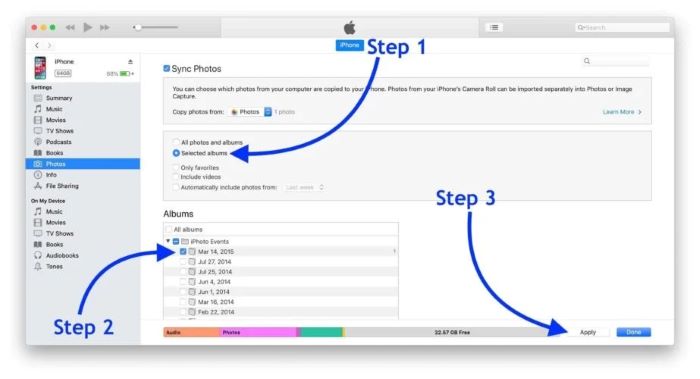
- Click on “Photos” in the sidebar.
- Uncheck the box next to the album you want to delete.
- Click “Apply” or “Sync” to update your iPhone.
For Finder (macOS Catalina and later):
- Connect your iPhone to your computer using a USB cable.
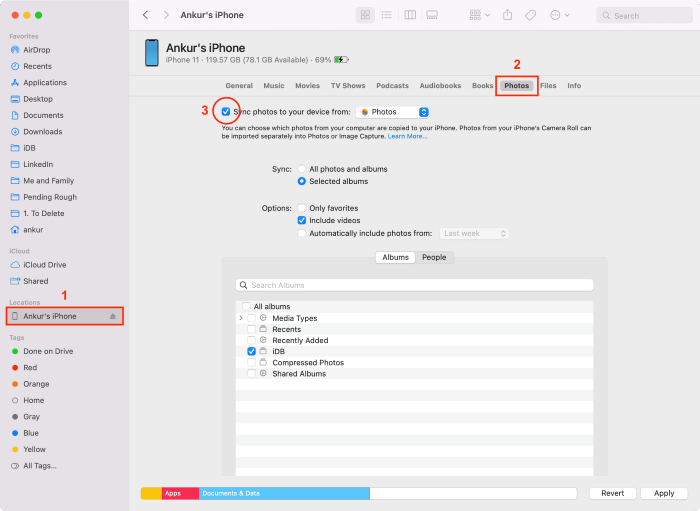
- Open Finder and click on your iPhone in the sidebar.
- Click on “Photos” in the sidebar.
- Uncheck the box next to the album you want to delete.
- Click “Apply” to update your iPhone.
Deleting Photos from Albums and the Recently Deleted Folder
If you want to delete individual photos from an album, follow these steps:
- Open the Photos app on your iPhone.
- Tap the “Albums” tab located at the bottom of the screen.
- Locate and open the album containing the photos you want to delete.
- Tap “Select” in the top right corner.
- Tap the photos you want to delete.
- Tap the trash icon in the bottom right corner.
- Confirm by tapping “Delete [number] Photos.”

To permanently delete the photos from your iPhone, you need to remove them from the Recently Deleted folder:
- Open the Photos app on your iPhone.
- Tap the “Albums” tab located at the bottom of the screen.
- Scroll down and tap “Recently Deleted.”
- Tap “Select” in the top right corner.
- Choose the photos you want to delete permanently or tap “Delete All” to remove all photos.
- Tap “Delete [number] Items” to confirm.

Troubleshooting Tips and Common Issues
If you’re having trouble deleting albums on your iPhone, try the following troubleshooting tips:
- Restart your iPhone: Hold down the power button (or the power and volume buttons on newer models) until the “slide to power off” slider appears. Slide it to turn off your iPhone, wait a few moments, and then turn it back on.
- Update your iOS: Go to Settings > General > Software Update and install any available updates.
- Check your storage: If your iPhone is low on storage, it may cause issues when trying to delete albums. Go to Settings > General > iPhone Storage to see if you need to free up space.
- Reset all settings: Go to Settings > General > Reset > Reset All Settings. This will revert your iPhone settings to default without deleting your data.
Common issues and their solutions:
- Can’t delete default albums (Camera Roll, Favorites, Recently Deleted): You cannot delete these albums as they are part of the iOS system. You can only delete custom albums created by you or third-party apps.
- Albums reappear after deleting: This may happen if your iPhone is syncing with iCloud or another cloud service. Check your sync settings and ensure that the albums are deleted from the cloud service as well.
Conclusion
With this comprehensive guide on how to delete albums on your iPhone, you should now be able to manage and organize your photo library with ease. Whether you’re using the Photos app, Shared Albums, third-party apps, iTunes, or Finder, remember to follow the steps carefully and refer to the troubleshooting tips and common issues section if you encounter any problems. Happy organizing!
